Image Size Requirements for Passport Photo (Simple Guide With Examples)
Passport photo rules look simple, but most applications get delayed because of small mistakes. The image might be the wrong size. The file might be too large. The background might not be clean. Or the face might not be centered correctly. These problems usually happen when people upload random phone pictures without checking the official requirements.
In this guide, you will learn the most common passport photo size requirements, how to match them without confusion, and how to export a photo that is accepted on the first try. I will also explain pixel sizes, KB limits, DPI, face positioning, and background rules in a simple way. At the end, you will find FAQs and a quick checklist you can follow every time.
What “passport photo size” really means
When a website says “passport photo size,” it usually means one of these things. Sometimes it means all of them at the same time.
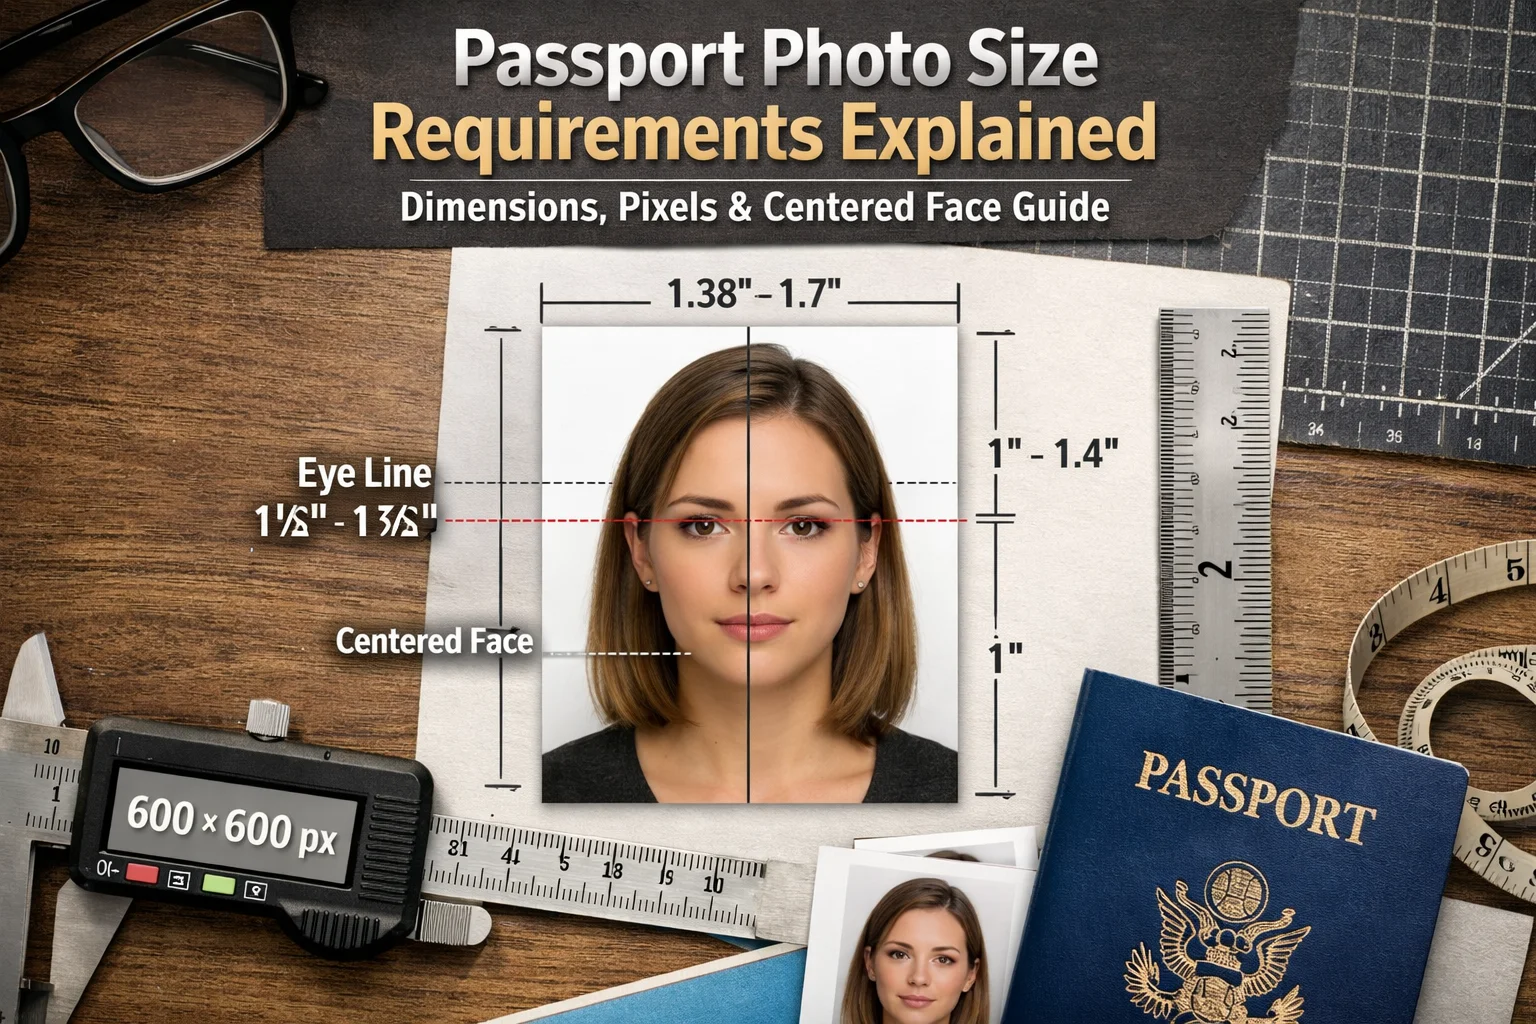
- Physical size: Example: 2 x 2 inches or 35 x 45 mm
- Pixel size: Example: 600 x 600 pixels or 413 x 531 pixels
- File size: Example: under 240 KB, under 100 KB, or under 20 KB
- Resolution: Example: 300 DPI (often needed for printing)
- Face area: Head size and face position inside the frame
If you only fix one thing, your photo can still be rejected. The goal is to match the exact requirement of the country or portal you are applying for.
Most common passport photo sizes (used worldwide)
Even though rules differ, many countries use a few standard sizes. These are the sizes you will see most often.
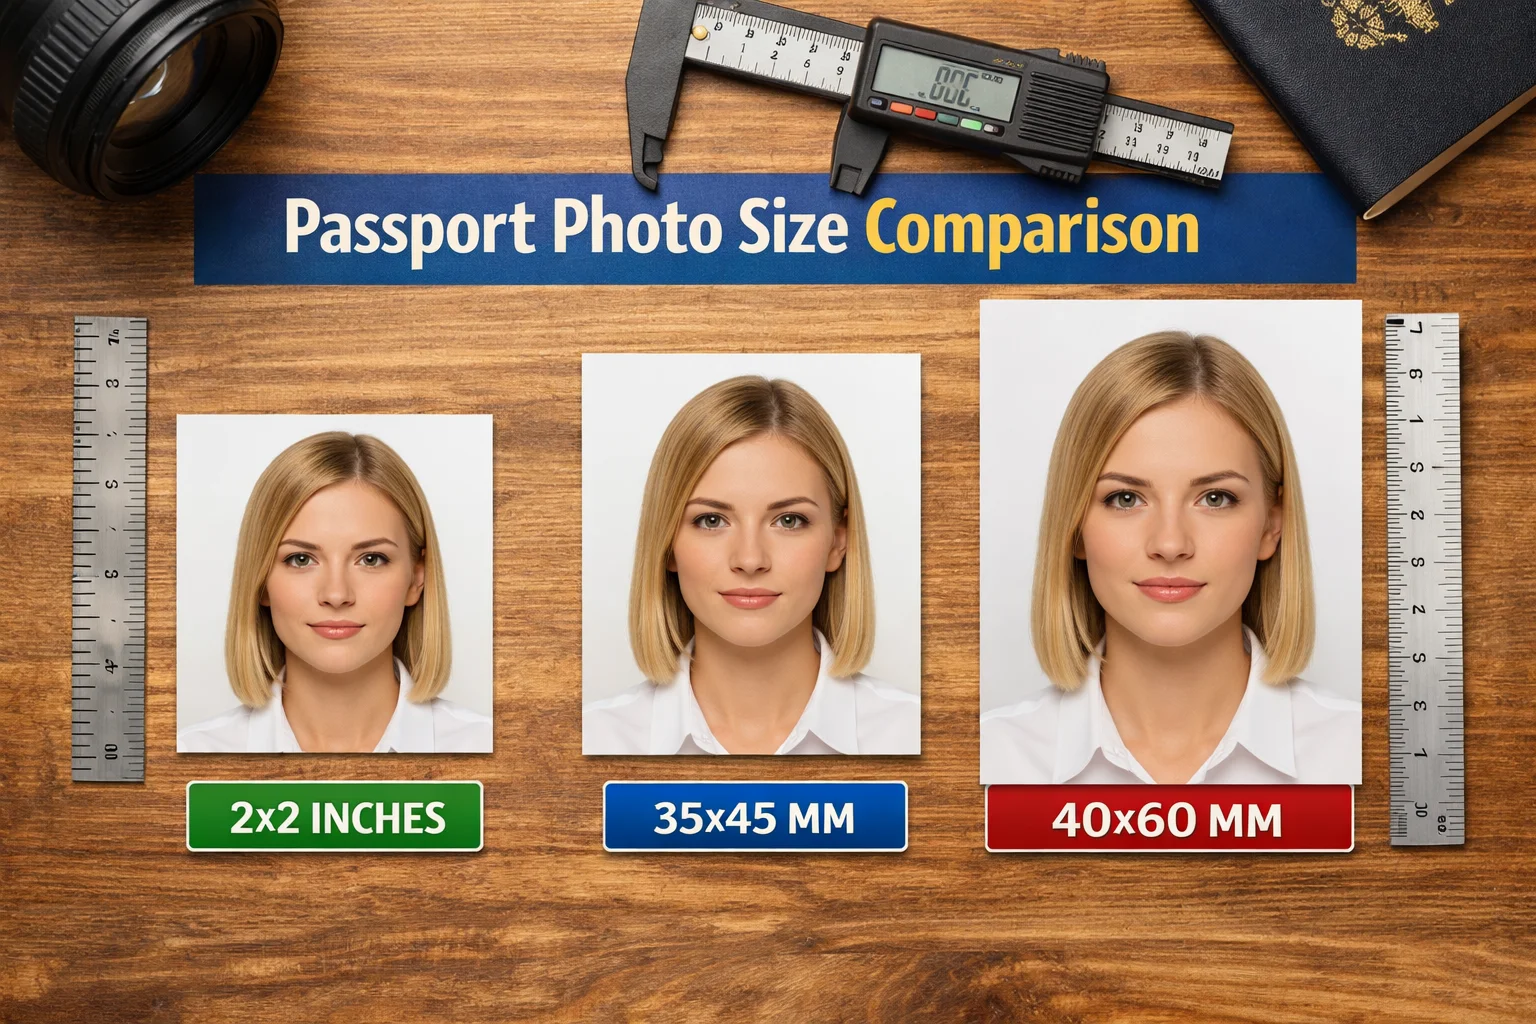
1) 2 x 2 inches (51 x 51 mm)
This is a very common format for online applications, especially when portals ask for a square photo.
- Physical size: 2 x 2 inches
- Typical pixel size: 600 x 600 pixels (for good quality)
- Background: usually plain white or light background
2) 35 x 45 mm
This is one of the most common sizes for passports and visas in many regions. It is a rectangle and usually used for printed photos too.
- Physical size: 35 x 45 mm
- Typical pixel size: around 413 x 531 pixels at 300 DPI
- Face height: often around 70 to 80 percent of the photo height
3) 4 x 6 cm (40 x 60 mm)
Some countries and offices ask for 4 x 6 cm. It is slightly larger than 35 x 45 mm.
- Physical size: 40 x 60 mm
- Typical pixel size: around 472 x 709 pixels at 300 DPI
Pixel size guide (simple explanation)
Pixels are important for online applications. A portal may reject your upload if the pixel dimensions are too small or too large.
Here is an easy way to understand it. Physical size is for printing. Pixel size is for digital uploads. If your portal only accepts a digital file, pixel size usually matters more than DPI.
Safe pixel sizes you can use (for clean quality)
- 2 x 2 inches: 600 x 600 pixels (safe and sharp)
- 35 x 45 mm: 413 x 531 pixels (good baseline)
- 35 x 45 mm high quality: 827 x 1063 pixels (extra sharp)
If the portal gives exact numbers, follow them. If not, these sizes usually work without making the face look blurry.
File size limits (KB rules) and how to handle them
Many online forms ask for a maximum file size. This is a very common reason for rejection because phone images are usually large.
You may see limits like 10 KB, 20 KB, 50 KB, 100 KB, or 200 KB. The smaller the limit, the harder it is to keep perfect quality, but it is still possible with the right steps.
What to do when the portal says “under 10 KB”
Under 10 KB is strict. You must keep the image simple. Plain background helps a lot. Avoid heavy filters and noisy backgrounds.
Use our dedicated tool here: Compress image to 10KB. It is designed for people who need a very small file size for forms and portals.
What to do when the portal says “under 20 KB”
Under 20 KB is also strict, but quality is usually easier to keep than 10 KB. If your photo is clean and properly cropped, 20 KB can still look acceptable.
Use our tool here: Compress image to 20KB.
Background requirements (what “plain background” means)
Most passport photo rules require a plain background, usually white or off-white. The purpose is simple. Your face should be clear and easy to detect.
Here are the most common background rules you should follow.
- Use a clean white or light background
- Avoid patterns, shadows, and objects behind you
- Do not use heavy editing that creates outlines around hair
- Keep the background evenly lit
If your background is not clean, many portals auto-reject the image. Even a small shadow behind your head can cause problems on strict systems.
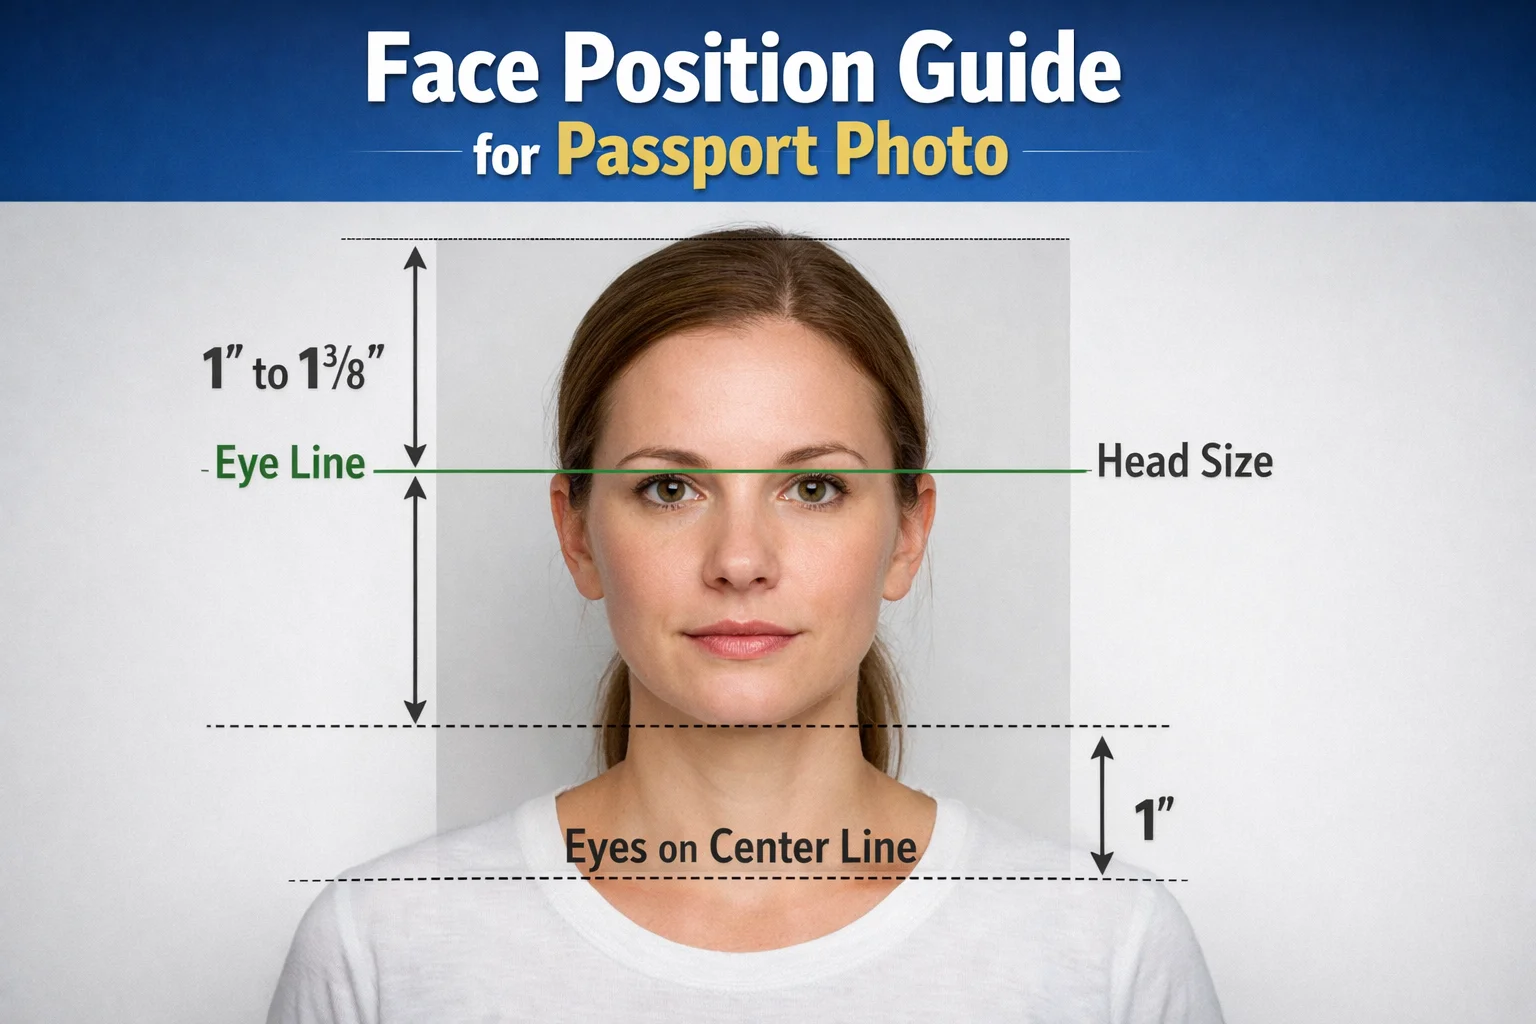
Face position and head size rules (this matters more than people think)
Passport photos are not normal profile pictures. The face must be centered, and the head must be the correct size inside the frame.
Most guidelines focus on these points.
- Your face should be looking straight at the camera
- Eyes open and visible
- Neutral expression (usually no big smile)
- Head centered, not tilted
- Correct space above the head (not too much, not too little)
Clothing, lighting, and glasses rules (simple but important)
These rules are not about fashion. They are about clarity and identity matching. Most rejections happen because of glare, shadows, and covered features.
Lighting
Use soft, even lighting. Avoid direct sunlight. Avoid strong shadows under the chin or behind the head.
Clothing
Wear normal clothing with a color that contrasts with the background. If you wear white on a white background, your shoulders may disappear.
Glasses
Many countries do not allow glasses in passport photos. If allowed, there must be no glare and your eyes must be fully visible.
Head coverings
Head coverings may be allowed for religious reasons, but your full face must be visible. Hairline and forehead visibility rules may vary.
DPI and print quality (when it matters and when it does not)
DPI is mostly relevant for printing. If you are uploading online, pixel size and file size usually matter more than DPI.
If an office asks for printed photos, 300 DPI is a safe standard. It keeps the print sharp.
If an online portal rejects your image because of “resolution,” it usually means your pixel size is too low, not your DPI.
Step-by-step: How to create an accepted passport photo from a phone picture
This is a simple workflow you can repeat. It works for most online portals.
Step 1: Take the photo correctly
Stand in front of a plain wall. Face the camera. Use good light. Keep your head straight. Avoid shadows.
Step 2: Crop to the correct ratio
If your requirement is 2 x 2 inches, that is a 1:1 square crop. If it is 35 x 45 mm, that is a 35:45 ratio.
Step 3: Resize to the right pixel size
Match the pixel size required by the portal. If you do not know, use a safe baseline like 600 x 600 for 2 x 2 inches.
Step 4: Compress to meet KB limits
If the portal has strict limits, use the targeted compressor pages.
- For strict portals: Compress image to 10KB
- For common strict limits: Compress image to 20KB
Step 5: Check final quality before upload
Zoom to 100 percent and check. Eyes should be clear. Face should not look waxy. Edges should not have compression blocks.
Common reasons passport photos get rejected
If your upload gets rejected, it is usually one of these issues.
- Wrong photo size or wrong pixel dimensions
- File size too large (KB limit exceeded)
- Background not plain or has shadows
- Face not centered or head size is incorrect
- Blurry image or low resolution
- Glasses glare or eyes not visible
- Over-editing that changes natural skin or edges
Quick checklist you can copy before uploading
- Correct size: 2x2 inches or 35x45 mm, as required
- Correct pixels: matches portal requirement
- File format: usually JPG or JPEG (sometimes PNG)
- File size: under required KB limit
- Background: plain white or light, no shadows
- Face: centered, neutral expression, eyes visible
- Lighting: even, no glare
FAQs: Image size requirements for passport photo
1) What is the most common passport photo size?
The most common sizes are 2 x 2 inches (51 x 51 mm) and 35 x 45 mm. Always confirm what your specific country or portal requires.
2) What pixel size should I use for a 2 x 2 passport photo?
A safe and clear size is 600 x 600 pixels. Some portals may accept smaller or larger, but 600 x 600 usually keeps good quality.
3) My application says “photo must be under 10 KB.” How do I do that?
Use a clean background and avoid heavy noise in the image, then compress the file using Compress image to 10KB.
4) My application says “photo must be under 20 KB.” What is the best method?
Crop correctly and keep the background simple, then compress using Compress image to 20KB.
5) Is DPI important for online passport photo uploads?
Usually no. DPI matters mostly for printing. Online portals mainly check pixel size and file size. If a portal mentions “resolution,” it often means pixels.
6) What file format is best for passport photos?
Most portals accept JPG or JPEG. Some also accept PNG. JPG is usually the best choice because it keeps file size smaller.
7) Why does my photo look blurry after compression?
This happens when the image is compressed too aggressively or the original photo was low quality. Try starting with a sharper photo, then compress slowly until it meets the KB limit without damaging face details.
8) Can I use a selfie for passport photos?
Some portals may accept it if the photo matches all rules, but selfies often fail due to shadows, angle, or background issues. A straight camera photo with even lighting works better.
9) Are glasses allowed in passport photos?
Rules vary. Many countries do not allow glasses. If allowed, there must be no glare and eyes must be fully visible. When in doubt, remove glasses.
10) What is the fastest way to fix a rejected passport photo?
Check the exact size and KB rule, then re-crop and compress properly. In most cases, fixing dimensions and file size solves the problem.
Conclusion: Get it right once and avoid delays
Passport photos are strict because they are used for identity verification. If your image is the wrong size, too heavy, or poorly cropped, your application can be delayed.
The best approach is simple. Follow the exact size requirement, keep the background clean, center your face, and make sure your file size is within the portal limit.
When you need strict KB sizes, use the targeted tools so you do not waste time guessing.
Need a strict file size for a passport or visa form? Use Compress image to 10KB or Compress image to 20KB and upload your photo with confidence.